I’ve been modernizing my OVH-hosted dedicated servers running my various services moving from a CPU from 2015 to a CPU from 2019. While that’s still not that new, they’re budget servers and I only pay $30 USD a month for them. I managed to upgrade 2 out of 3 of them without any issues, making some improvements as I go, including enabling encryption at rest for all my data. However, the last server proved to be a problem.
Normally, I pay for the server, let OVH install a base OS (like Ubuntu Server), then use nixos-anywhere to remotely wipe the machine and install NixOS over top without any issues. But this time, after rebooting, the server would hang trying to mount my RAID array (each server has 2x SSD drives that I RAID1 for performance and fault tolerance.) I couldn’t SSH to remotely unlock my drives because the SSH would immediately close the connection after negotiating an encrypted tunnel.
OVH included an emergency rescue OS that I could reboot into and inspect the drive, which gave me the error message:
nvme0n1p2 does not have a valid v1.2 superblock, not importing!
In this post, I walk through all the steps I went through to diagnose and arrive at a nixos-anywhere bug caused by a Linux kernel change.
The Start Configuration
I started with a basic configuration that looked exactly like my other successful hosts, albeit with a change to the disk id. I opted to use /dev/disk/by-id/XYZ instead of /dev/sda which most of the Disko examples use because I wanted to be deterministic.
| |
Initial steps into the hole
I’ll admit, I went a little crazy investigating this one. Initially, the error appeared to suggest some kind of intermittent issue or a configuration mistake on my part. Given the issue manifested as my SSH server closing the connection, I initially assumed it was related to that. I tried changing kernel modules, disabling impermanence (a NixOS+btrfs feature that causes NixOS to delete and rebuild the root filesystem each time to force me to configure everything using Nix), I messed with the initrd settings (Linux’s second stage bootloader that contains a kernel that launches my boot-time SSH server for remote unlocking).
While I had been using systemd-initrd to boot my other hosts, I noticed NixOS 26.05 changed initrd to systemd and tried rolling back to the old version. Switching from systemd-boot to the older grub boot wasn’t successful given my servers were EUFI boot based.
Given Nix Flakes are designed to be reproducible and deterministic, I even tried reverting nix.flake file back to an older Nixpkgs release. That failed too which really surprised me, but it turns out Nix Flakes doesn’t pin everything (foreshadowing.)
When nothing worked including removing the LUKS partition, I shifted my focus towards the higher-level partitions–the GPT and mdadm RAID array.
The descent into madness
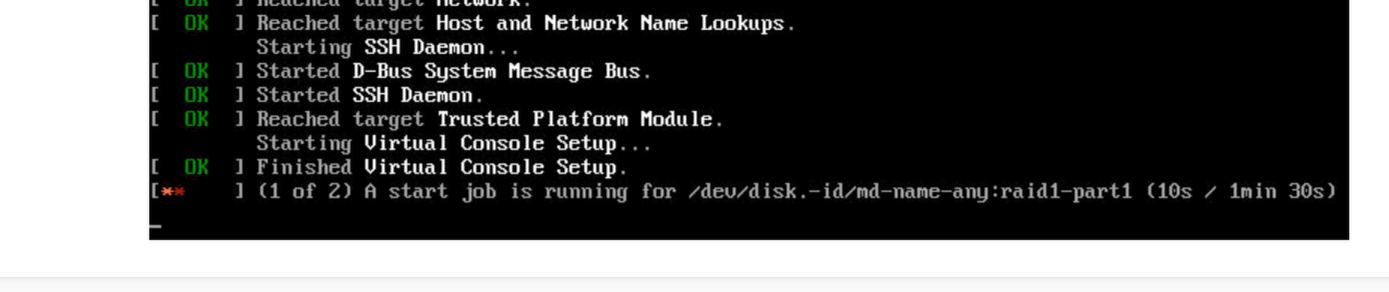
Clearly the boot errors were telling me something useful that the RAID array was the problem, not the LUKS encryption. I then started investigating other options. I tried configuring only the A drive or B drive at a time.
To confirm whether it was an issue where initrd couldn’t load the RAID array for booting, but it was valid, I tried configuring the root FS on a single drive and mounting the RAID array on a /test folder, that failed until I marked it as optional to boot, then the OS was able to boot. Once inside the OS, tried to manually mount the mdadm array and faced the same error:
nvme0n1p2 does not have a valid v1.2 superblock, not importing!
It’s taunting me. Even waiting for cat /proc/mdstat to show the RAID array was fully rebuilt.
I wrote a previous post about diffing changes between releases, which came in handy.
All the king’s men, AI, GitHub issues couldn’t figure it out
At this point, my hair is turning grey, my browser was growing slow with many tabs, and I had several LLM chats open with Claude Code, GLM-5.2, and Kimi-2.5. All of them confidently telling me to do something I already tried or go down different paths.
Assuming it was an issue with disk partitioning, I opened a GitHub issue disko#1276. They gave me a few ideas including there were was some old data remaining on the drive, thus I zeroed both drives start to the finish before running the disk partitioning:
| |
Nope. I got a new dedicated server to test if it was a hardware issue, but I sadly had to renew my old server for a month while this sat around.
Manual Partitioning
I then turned to manually provisioning my RAID array. After using nixos-anywhere to kexec (kexec live boots from one Linux kernel into a new one), I ran the following commands:
The cryptsetup command, which is required to create a LUKS encrypted volume isn’t in nixos-installer by default, so I had to download it using:
| |
Then after partitioning the volumes, I ran
| |
Then letting the RAID array rebuild and cleanly unmounting after installing:
| |
Increase the log level
But that didn’t work for me, so I then I started to investigate other ways of getting debugging information out. I tried to dump out debug logs to the boot screen using the following:
| |
That worked, but unfortunately too much got dumped out and I couldn’t scroll back in the KVM to read anything.
Going serial
I then found that OVH exposed a serial over LAN feature which I could SSH into. If I could get this work, then I could pipe all the boot logs to a local file.
Some poking around the emergency distro gave me the commands I needed:
| |
I was able to confirm that I could print things to my Serial over SSH session:
| |
Now, I add console=ttyS1,115200n8 to the Kernel boot params to get more output:
| |
I needed more information. I combined that with a boot time systemd job that I manually printed data out. Figuring out when to get this to run is tricky. Consulting bootup shows
| |
I put the project on the back-burner and went on an international vacation for a few weeks to recover.
Making some progress
While I was scuba diving, other people started reporting the same issue which made me realize there was something bigger including somebody mentioning there was a Kernel bug
I briefly tested using an older version of nixos-anywhere, but that didn’t work.
| |
Back to the build
I continued to try to print out more debugging information during the boot by getting the mdadm-assemble job running during the start-up.
| |
But that never worked because it was getting stuck due to dev-md-raid1.device failing and it’s not possible to get stuck, but I found the boot logging over serial trick useful enough to share it in the post.
Matching kernel versions
Another GitHub comment mentioned Linux kernels needing matching, I then explored a bit more about that.
What kernel version is getting installed?
| |
What version is the nixos-anywhere installer using?
| |
The NixOS installer kernel is newer than the one that boots. There could be something to this.
The Fix
I grabbed a matching version of the kexec from GitHub releases.
| |
Or compile one freshly:
| |
Let’s see what happens after an install.
| |
Looking at the boot log, I get:
| |
Sounds promising. Is that a working boot I hear?
| |
Yes it is success!

My server boots and I’m able to proceed
What changed in the kernel?
Can we find the actual bug? This sounds like a job for AI. I cloned the repository:
| |
Then opened up OpenCode with the Kimi K2.5 model and asked it to review commits between 6.18.38 and 7.0.3 related to superblock changes. It looked at all the commits between those versions, looked for commits related to the superblock, and reviewed the changes.
<ai> The Problem: Logical Block Size (LBS) Superblock Change Commits Involved:
- commit 62ed1b582246 (Nov 2025): “md: allow configuring logical block size”
- Added a new logical_block_size field to the mdp_superblock_1 structure
- This field was carved out of the previously reserved pad3[64-32] padding area
- Changed the superblock layout for 1.x metadata arrays
- commit 9c47127a807d (Nov 2025): “md: add check_new_feature module parameter”
- Added validation that rejects arrays with non-zero padding in super_1_load()
- When an older kernel (6.18.x) sees the new logical_block_size field (which was previously padding), it detects non-zero padding and rejects the array
- commit a4166f1c4893 (Dec 2025): “md: Fix forward incompatibility from configurable logical block size”
- The fix: Only sets logical_block_size for newly created arrays
- For existing arrays from old kernels, the LBS field remains 0 in the superblock
When kernel 7.0.9 creates a new RAID array:
- It writes the logical_block_size value to the superblock (in what used to be padding)
- This makes the superblock incompatible with older kernels (6.18.x)
- When 6.18.38 tries to assemble the array, it sees non-zero padding and fails </ai>
Looking at these commits, they’re not really bugs, but changes that are intended to improve reliability. They are forwards incompatible, meaning the older version of the kernel can’t read them.
Conclusion
This bug was difficult and very frustrating to track down. Reinstalling and testing each attempt took a lot of time. I started with the mysterious error: nvme0n1p2 does not have a valid v1.2 superblock, not importing!
After weeks of different attempts to fix it, I finally discovered there was a change in Linux 6.19.x to the MD array superblock (metadata stored in the RAID array) that added more information that Linux 6.18.x kernels couldn’t decode. This was intended to make RAID arrays more reliable.
Since the nixos-anywhere installer used 7.0.x, but nixpkgs currently used 6.18.x, it would fail during booting. The OVH emergency distro also was too old to decode it.
The fix was to explicitly download a matching kexec installer binary from nixos-images and pass that with --kexec to the kexec phase.
Through this, I also learned how to debug kernel booting using the serial over SSH. While it didn’t provide a lot of insight, it still provides a way to get debug info out.
My server has since been added to my Kubernetes cluster and I’m also entirely on faster hosts with encrypted disks.
References
AI Disclosure
Some LLMs were used in the research of this problem, however outside of the snippet clearly stated above, LLMs provided no other content.