Local Energy Monitoring using the Emporia Vue 2

This entry is part 5 of 5 in the series Home Energy Monitoring

I’ve previously explored the world of home energy monitoring systems and in the past arrived at using the Brultech GreenEye Monitor for a project in a friend’s house. It had the advantage of being local out-of-the-box and had a wide range of compact CTs that made fitting the electronics in the breaker box a lot easier, but it had one flaw that made it not suitable for my condo. It had to be mounted outside the breaker box with wires running into the box. I had no space in my condo, so I instead explored other options.

I came across the Emporia Vue2 and identified that it was running a standard ESP32 device and was easy to reflash with custom ESPHome firmware. ESPHome is an open-source framework for creating firmware to collect data from a variety of different sensors and publish it to MQTT/Home Assistant. This sounded perfect, so I ordered a Vue2 and here’s how I made it work.

Gear Used

Installation

I found the emporia-vue-local GitHub project here emporia-vue-local/esphome and followed the guide here. I had some issues trying to wire up to the DTR and CTS pins, so I instead connected IO0 and CTS to GND at boot, then let EN go high when I was ready to program.

I tried using the ESPHome Web UI to program the device, but it never worked correctly, so instead I used ESPTool on my laptop (Installation Guide).

First I made a backup of my existing firmware:

python3 -m esptool read_flash 0 0x400000 flash_contents.bin
esptool.py v4.4
Found 3 serial ports
Serial port /dev/cu.usbserial-130
Connecting...
Detecting chip type... Unsupported detection protocol, switching and trying again...
Connecting...
Detecting chip type... ESP32
Chip is ESP32-D0WD (revision v1.0)
Features: WiFi, BT, Dual Core, 240MHz, VRef calibration in efuse, Coding Scheme None
Crystal is 40MHz
MAC: de:ad:be:ef:ca:fe
Stub is already running. No upload is necessary.
4194304 (100 %)
4194304 (100 %)
Read 4194304 bytes at 0x00000000 in 379.5 seconds (88.4 kbit/s)...
Hard resetting via RTS pin...

Then I went to my ESPHome dashboard and created a new configuration. I started with the reference ESPHome, but made a few changes. Specifically:

I updated the CTs to match my phases and circuits. You will need to do the same.

More importantly, I restructured how the sensors were configured to improve accuracy and reduce useless events. More information is found in the Accuracy section below.

Here’s the current ESPHome YAML:

esphome:
  name: emporia-vue2

external_components:
  - source: github://emporia-vue-local/esphome@dev
    components: [ emporia_vue ]

esp32:
  board: esp32dev
  framework:
    type: esp-idf
    version: recommended

# Enable Home Assistant API
mqtt:
  broker: mqtt.example.domain
  discovery_unique_id_generator: mac
  discovery_object_id_generator: none

logger:
  logs:
    sensor: INFO

ota:
  password: !secret ota
  num_attempts: 3

wifi:
  ssid: !secret wifi_ssid
  password: !secret wifi_password

i2c:
  sda: 21
  scl: 22
  scan: false
  frequency: 200kHz  # recommended range is 50-200kHz
  id: i2c_a

time:
  - platform: sntp
    id: my_time
    timezone: America/Los_Angeles

debug:
  update_interval: 120s

text_sensor:
  - platform: debug
    reset_reason:
      name: "Reset Reason"

# these are called references in YAML. They allow you to reuse
# this configuration in each sensor, while only defining it once
.defaultfilters:
  - &moving_avg
    # we capture a new sample every 0.24 seconds, so the time can
    # be calculated from the number of samples as n * 0.24.
    sliding_window_moving_average:
      # we average over the past 2.88 seconds
      window_size: 12
      # we push a new value every 1.44 seconds
      send_every: 6
  - &invert
    # invert and filter out any values below 0.
    lambda: 'return max(-x, 0.0f);'
  - &pos
    # filter out any values below 0.
    lambda: 'return max(x, 0.0f);'
  - &abs
    # take the absolute value of the value
    lambda: 'return abs(x);'
  # Reduce noise in the power class
  - &power_max
    or:
      - delta: 5
      - throttle: 60s
  - &power_min
    throttle: 3s
  - &throttle_energy
    or:
      - delta: 10
      - throttle: 60s

sensor:
  - platform: emporia_vue
    i2c_id: i2c_a
    phases:
      - id: phase_a  # Verify that this specific phase/leg is connected to correct input wire color on device listed below
        input: BLACK  # Vue device wire color
        calibration: 0.022  # 0.022 is used as the default as starting point but may need adjusted to ensure accuracy
        # To calculate new calibration value use the formula  *  / 
        voltage:
          name: "Phase A Voltage"
          filters: [*moving_avg, *pos]
      - id: phase_b  # Verify that this specific phase/leg is connected to correct input wire color on device listed below
        input: RED  # Vue device wire color
        calibration: 0.022  # 0.022 is used as the default as starting point but may need adjusted to ensure accuracy
        # To calculate new calibration value use the formula  *  / 
        voltage:
          name: "Phase B Voltage"
          filters: [*moving_avg, *pos]
    ct_clamps:
      - phase_id: phase_a
        input: "A"  # Verify the CT going to this device input also matches the phase/leg
        power:
          name: "Phase A Power"
          id: phase_a_power
          device_class: power
          filters: [*moving_avg, *pos]
      - phase_id: phase_b
        input: "B"  # Verify the CT going to this device input also matches the phase/leg
        power:
          name: "Phase B Power"
          id: phase_b_power
          device_class: power
          filters: [*moving_avg, *pos]
      # Pay close attention to set the phase_id for each breaker by matching it to the phase/leg it connects to in the panel
      # Some circuits are commented out because they don't have a CT connected yet
      - { phase_id: phase_a, input:  "1", power: { name: "Heat Pump Power #1", internal: true, id:  cir1, filters: [ *pos, multiply: 2 ] } }
      - { phase_id: phase_a, input:  "2", power: { name: "Oven Power #2", id:  cir2, internal: true, filters: [ *pos, multiply: 2 ] } }
      - { phase_id: phase_a, input:  "5", power: { name: "Dryer Power #5", internal: true, id:  cir5, filters: [ *pos, multiply: 2 ] } }
      - { phase_id: phase_a, input:  "6", power: { name: "Dishwasher / Disposal Power #6", internal: true, id:  cir6, filters: [ *pos ] } }
      - { phase_id: phase_b, input:  "8", power: { name: "Kitchen Power #8", id: cir8, internal: true, filters: [ *pos ] } }
      - { phase_id: phase_a, input:  "9", power: { name: "Washer Power #9", id: cir9, internal: true, filters: [ *pos ] } }
      - { phase_id: phase_a, input: "10", power: { name: "Kitchen Power #10", id: cir10, internal: true, filters: [ *pos ] } }
      # - { phase_id: phase_b, input: "11", power: { name: "Bathroom Power #11", id: cir11, filters: [ *moving_avg, *pos ] } }
      # - { phase_id: phase_b, input: "12", power: { name: "Stove / Hood Fan Power #12", id: cir12, filters: [ *moving_avg, *pos ] } }
      # - { phase_id: phase_a, input: "13", power: { name: "Microwave Power #13", id: cir13, filters: [ *moving_avg, *pos ] } }
      - { phase_id: phase_a, input: "14", power: { name: "Bedroom Power #14", id: cir14, internal: true, filters: [ *pos ] } }
      - { phase_id: phase_b, input: "15", power: { name: "General Power #15", internal: true, id: cir15, filters: [ *pos ] } }
      - { phase_id: phase_b, input: "16", power: { name: "General Power #16", internal: true, id: cir16, filters: [ *pos ] } }

  - { platform: copy, id:  cir1_b, source_id: cir1, filters: [ *power_min, *power_max ], name: "Heat Pump Power #1" }
  - { platform: copy, id:  cir2_b, source_id: cir2, filters: [ *power_min, *power_max ], name: "Ovean Power #2" }
  - { platform: copy, id:  cir5_b, source_id: cir5, filters: [ *power_min, *power_max ], name: "Dryer Power #5" }
  - { platform: copy, id:  cir6_b, source_id: cir6, filters: [ *power_min, *power_max ], name: "Dishwasher / Disposal Power #6" }
  - { platform: copy, id:  cir8_b, source_id: cir8, filters: [ *power_min, *power_max ], name: "Kitchen Power #8" }
  - { platform: copy, id:  cir9_b, source_id: cir9, filters: [ *power_min, *power_max ], name: "Washer Power #9" }
  - { platform: copy, id:  cir10_b, source_id: cir10, filters: [ *power_min, *power_max ], name: "Kitchen Power #10" }
  - { platform: copy, id:  cir14_b, source_id: cir14, filters: [ *power_min, *power_max ], name: "Bedroom Power #14" }
  - { platform: copy, id:  cir15_b, source_id: cir15, filters: [ *power_min, *power_max ], name: "General Power #15" }
  - { platform: copy, id:  cir16_b, source_id: cir16, filters: [ *power_min, *power_max ], name: "General Power #16" }


  - platform: template
    name: "Total Power"
    lambda: return id(phase_a_power).state + id(phase_b_power).state;
    update_interval: 1s
    id: total_power
    device_class: power
    state_class: measurement
    unit_of_measurement: "W"

  - name: "Total Daily Energy"
    power_id: total_power
    platform: total_daily_energy
    accuracy_decimals: 0
    restore: false
    unit_of_measurement: Wh
    state_class: total_increasing
    device_class: energy
    filters: [ *throttle_energy ]

  - { power_id:  cir1,  platform: total_daily_energy, accuracy_decimals: 0, restore: false, unit_of_measurement: "Wh", state_class: "total_increasing", device_class: "energy", filters: [ *throttle_energy ], name: "Heat Pump Energy" }
  - { power_id:  cir2,  platform: total_daily_energy, accuracy_decimals: 0, restore: false, unit_of_measurement: "Wh", state_class: "total_increasing", device_class: "energy", filters: [ *throttle_energy ], name: "Oven Energy" }
  - { power_id:  cir5,  platform: total_daily_energy, accuracy_decimals: 0, restore: false, unit_of_measurement: "Wh", state_class: "total_increasing", device_class: "energy", filters: [ *throttle_energy ], name: "Dryer Energy" }
  - { power_id:  cir6,  platform: total_daily_energy, accuracy_decimals: 0, restore: false, unit_of_measurement: "Wh", state_class: "total_increasing", device_class: "energy", filters: [ *throttle_energy ], name: "Dishwasher / Disposal Energy" }
  - { power_id:  cir8,  platform: total_daily_energy, accuracy_decimals: 0, restore: false, unit_of_measurement: "Wh", state_class: "total_increasing", device_class: "energy", filters: [ *throttle_energy ], name: "Kitchen #8 Energy" }
  - { power_id:  cir9,  platform: total_daily_energy, accuracy_decimals: 0, restore: false, unit_of_measurement: "Wh", state_class: "total_increasing", device_class: "energy", filters: [ *throttle_energy ], name: "Washer Energy" }
  - { power_id:  cir10, platform: total_daily_energy, accuracy_decimals: 0, restore: false, unit_of_measurement: "Wh", state_class: "total_increasing", device_class: "energy", filters: [ *throttle_energy ], name: "Kitchen #10 Energy" }
  - { power_id:  cir14, platform: total_daily_energy, accuracy_decimals: 0, restore: false, unit_of_measurement: "Wh", state_class: "total_increasing", device_class: "energy", filters: [ *throttle_energy ], name: "Bedroom Energy" }
  - { power_id:  cir15, platform: total_daily_energy, accuracy_decimals: 0, restore: false, unit_of_measurement: "Wh", state_class: "total_increasing", device_class: "energy", filters: [ *throttle_energy ], name: "General #15 Energy" }
  - { power_id:  cir16, platform: total_daily_energy, accuracy_decimals: 0, restore: false, unit_of_measurement: "Wh", state_class: "total_increasing", device_class: "energy", filters: [ *throttle_energy ], name: "General #16 Energy" }

Save the above configuration, then hit Install > Manual Install > Modern Format. Let it compile, then download. Then using the

python3 -m esptool --chip esp32 -p /dev/cu.usbserial-130 write_flash  0x0 ~/Downloads/emporia-vue2-factory.bin 
esptool.py v4.4
Serial port /dev/cu.usbserial-130
Connecting....
Chip is ESP32-D0WD (revision v1.0)
Features: WiFi, BT, Dual Core, 240MHz, VRef calibration in efuse, Coding Scheme None
Crystal is 40MHz
MAC: a8:48:fa:97:90:3c
Uploading stub...
Running stub...
Stub running...
Configuring flash size...
Flash will be erased from 0x00000000 to 0x000dbfff...
Compressed 897488 bytes to 564586...
Wrote 897488 bytes (564586 compressed) at 0x00000000 in 54.7 seconds (effective 131.3 kbit/s)...
Hash of data verified.

Leaving...
Hard resetting via RTS pin...

References

https://flaviutamas.com/2021/reversing-emporia-vue-2

Installing CTs

Installing the CTs is the hardest and most dangerous part of this. If you’re not familiar with the risks with working inside a breaker box and the fact that the mains generally can’t be turned off, you should consult a qualified electrician.

The official hardware guide can be found here.

When installing the CTs, make sure that you match the phases with the colors and the holes in the top of the Vue2. Otherwise you won’t get the correct data. Note the bolded items. My BLACK wire went into the A hole and RED went into the B hole on the top of the Vue2.

      - id: phase_a 
        input: BLACK  # Vue device wire color
      - id: phase_b  # Verify that this specific phase/leg is connected to correct input wire color on device listed below
        input: RED  # Vue device wire color
    ct_clamps:
      - phase_id: phase_a
        input: "A"  # Verify the CT going to this device input also matches the phase/leg
        power:
          name: "Phase A Power"
          id: phase_a_power
          device_class: power
          filters: [*moving_avg, *pos]
      - phase_id: phase_b
        input: "B"  # Verify the CT going to this device input also matches the phase/leg
        power:
          name: "Phase B Power"
          id: phase_b_power
          device_class: power
          filters: [*moving_avg, *pos]
      # Pay close attention to set the phase_id for each breaker by matching it to the phase/leg it connects to in the panel
      - { phase_id: phase_a, input:  "1", power: { name: "Heat Pump Power #1", id:  cir1, filters: [ *moving_avg, *pos, multiply: 2 ] } }
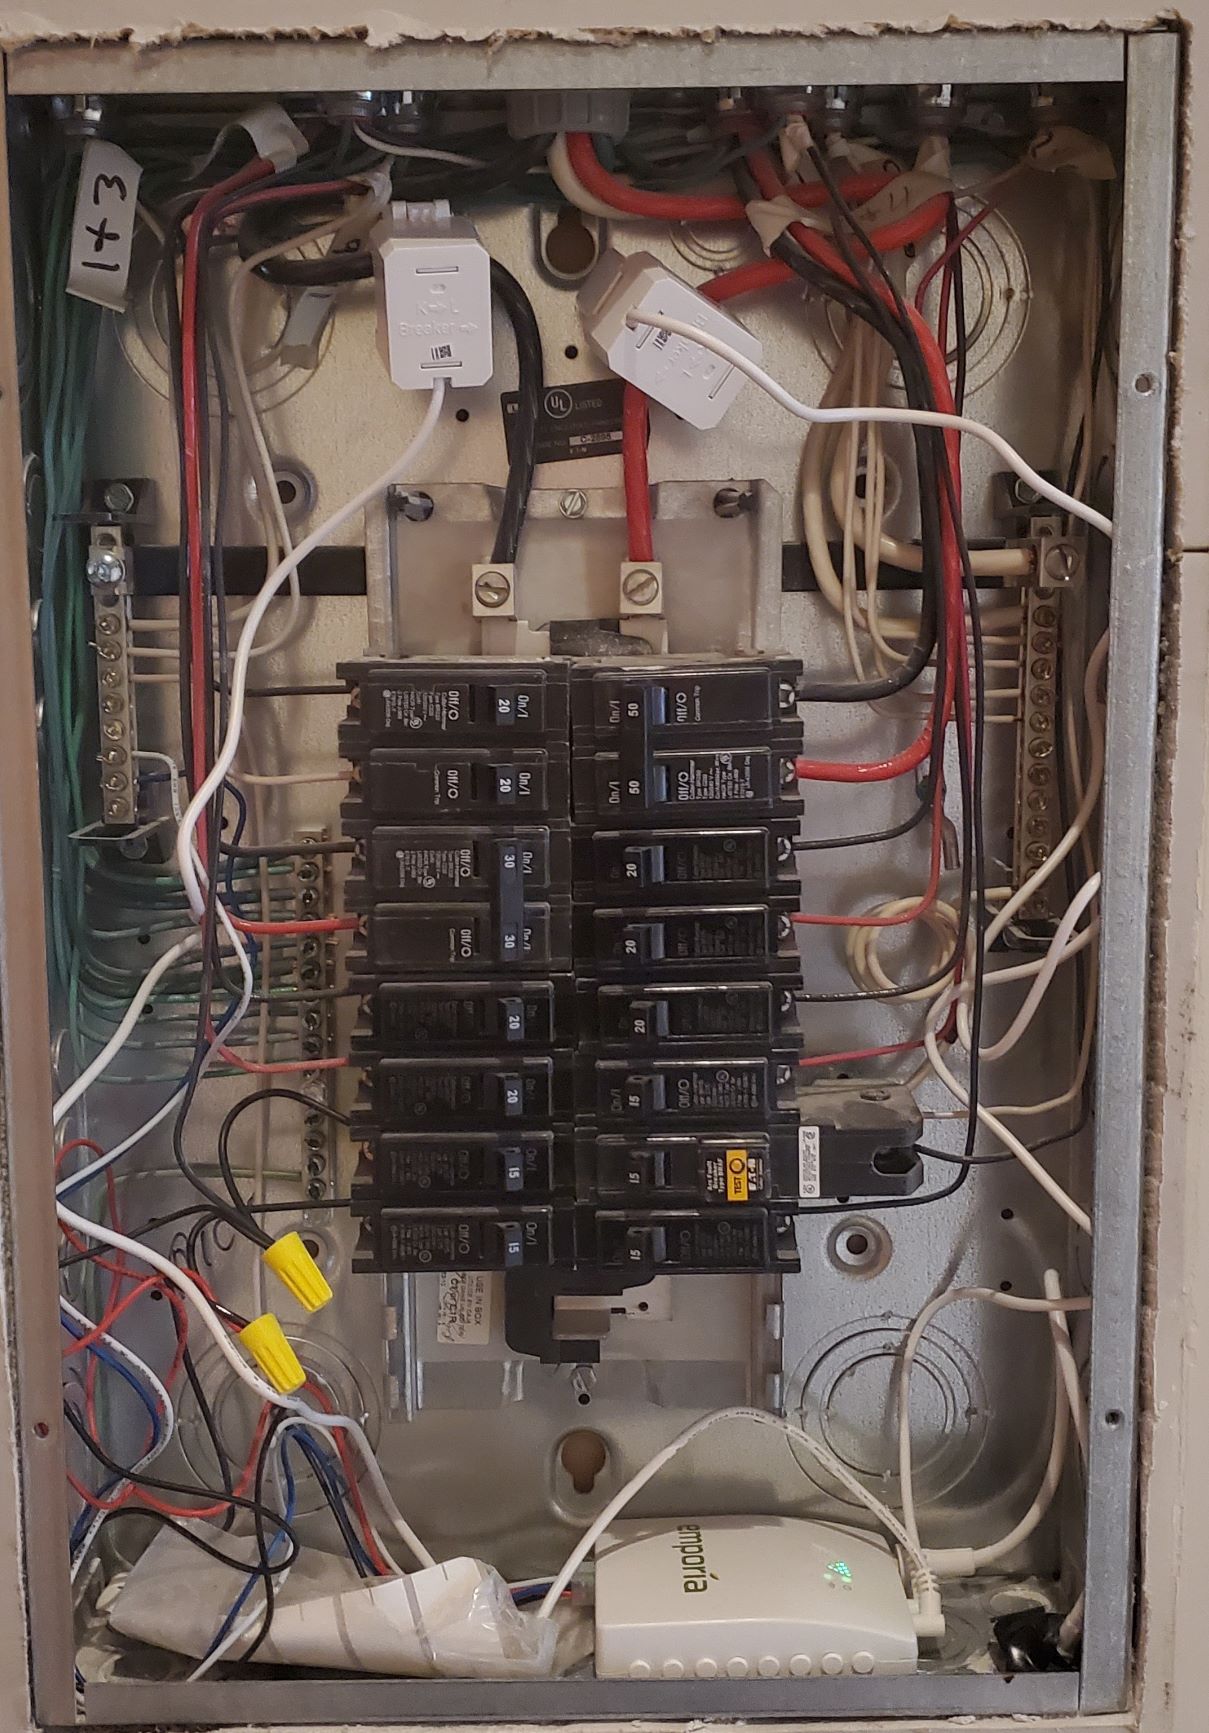
An in progress pic showing it installed with just the CTs on the main loads. Note that the third phase is unused and is joined to the neutral and not left floating.

When installing the CTs on the individual circuits in North American houses, you may encounter circuits that have two phases (240v circuits). Two CTs are needed if it’s unbalanced, but one CT is sufficient if it’s a “balanced load.” I found the following quote to help me when installing:

If a double breaker circuit is “balanced”, power is evenly drawn through both poles. In this instance, an energy monitoring app can typically take the reading from one CT and multiply it by 2 to get the correct power reading.

However, if a circuit is “unbalanced”, two CTs should be used. Pumps, electric resistance heat, and HVAC units are typically balanced. Subpanels, dryers, electric ovens/ranges, and hot tubs are not balanced. Typically, if a piece of equipment is doing more than one thing, it is an unbalanced load. A dryer needs to rotate the drum and dry the clothes. Also, if a circuit has a neutral wire, this most likely means that the load is unbalanced and requires two CTs.

https://www.powerwisesystems.com/blog/measure-electricity-use-current-transformers/

I only found one unbalanced load, my clothes dryer. I installed a CT on both legs, then updated the ESPHome template to aggregate both legs, then send it to MQTT. The following snippet shows how to implement an unbalanced load sensor:

    ct_clamps:
      - { phase_id: phase_a, input:  "5", power: { name: "Dryer Power #5", internal: true, id:  cir5, filters: [ *pos ] } }
      - { phase_id: phase_b, input:  "7", power: { name: "Dryer Power #7", internal: true, id:  cir7, filters: [ *pos ] } }


[...]

  - platform: template
    name: "Dryer Power"
    lambda: return id(cir5).state + id(cir7).state;
    update_interval: 1s
    id: dryer_power
    device_class: power
    state_class: measurement
    unit_of_measurement: "W"
    filters: [ *power_min, *power_max ]

  - { power_id:  dryer_power,  platform: total_daily_energy, accuracy_decimals: 0, restore: false, unit_of_measurement: "Wh", state_class: "total_increasing", device_class: "energy", filters: [ *throttle_energy ], name: "Dryer Energy" }
Next phase after installing almost all of the CTs. Not all circuits will get CTs.

After everything’s safely installed, turn the breaker on and verify that you’re receiving traffic in MQTT and in Home Assistant.

HA Recorder Management

When I first installed the Vue2 and pointed it to Home Assistant, it didn’t take long for the Postgres instance behind my HA Recorder to run out of disk space.

I checked the highest metrics and as I suspected, the integral was using the most space. It was being emitted every second as a watt-hour with 2 decimal points, but everywhere else I was using kilowatt-hours with 2 decimal points.

SELECT
  COUNT(*) AS cnt,
  COUNT(*) * 100 / (SELECT COUNT(*) FROM states) AS cnt_pct,
  entity_id
FROM states
GROUP BY entity_id
ORDER BY cnt DESC
# of states% totalentity_id
643,60922%sensor.total_energy_3 (The integral generated by Vue2)
251,7458%sensor.total_power
251,2818%sensor.total_energy
251,1298%sensor.daily_electricity_usage
239,8138%sensor.total_energy_cost
210,8667%sensor.phase_b_power
192,5766%sensor.phase_a_power
92,2123%sensor.media_cabinet_total_power

Not good. This is likely due to the fact that the integration sensor in ESPHome emits a new value every 2.88s just like the Watt sensor. This metric is designed to be long-term and Home Assistant’s energy tab aggregates it up per hour, so there’s no need for that level of precision. Instead, I’m going to have it emit it less frequently, but first let’s see what else is wrong.

Accuracy Analysis and Comparison

I then tried to compare the accuracy of the Vue2 versus other devices I have been using prior to this. The following shows a comparison with the Zooz ZEN15 Z-Wave Outlet installed on my washing machine.
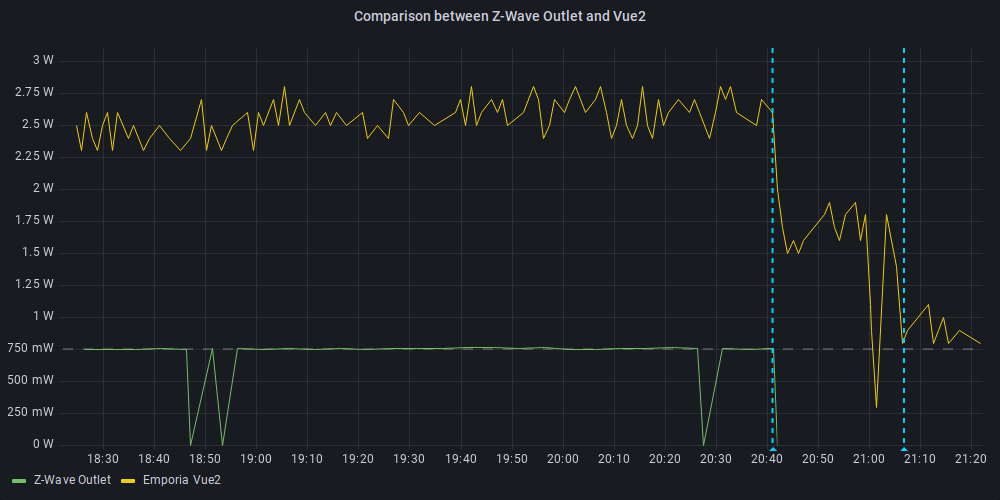
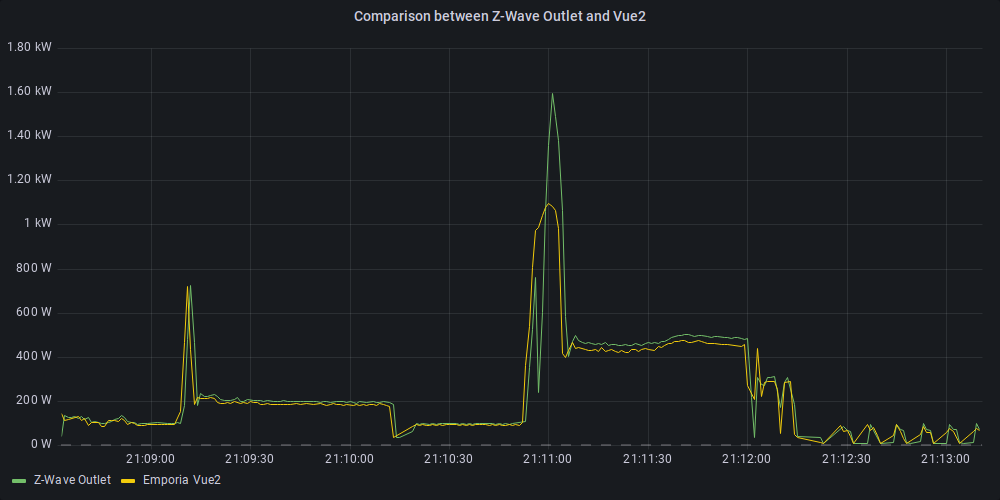
Baseline

Here we see there is a difference of about ~1W, but this was attributed to the power draw of the outlet itself combined with another low power device on the same circuit not measured. After removing those devices, the measured value converges on about 750mW from both devices. This is good and indicates both devices are at least agreeing with each other.

Under Load

However, under load from a single wash load we see quite a different perspective:

This graph shows a big difference in the wave-forms. The Z-Wave outlet reported 126Wh for the entire run vs the Emporia Vue2 reporting 204Wh for a difference of 80Wh. Zooming in on this wave form in two places:

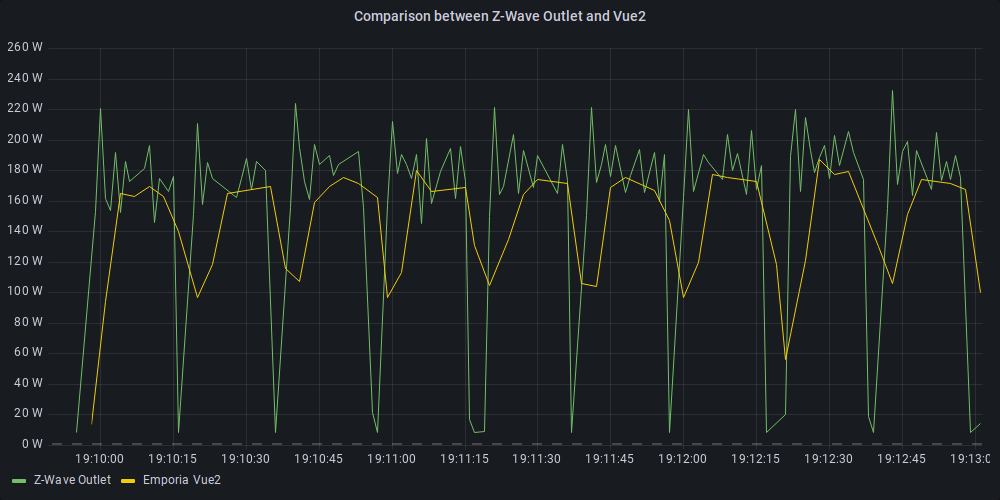
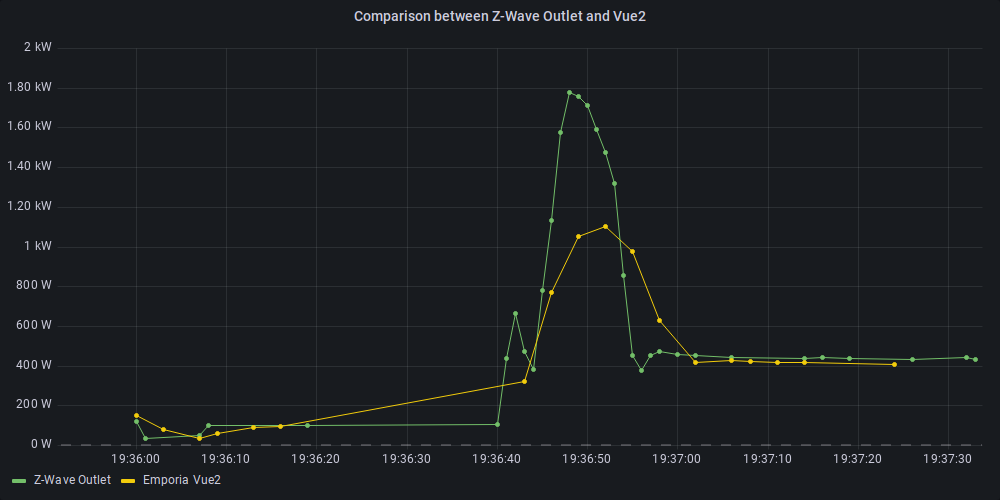
I suspect this is caused by the power metric being averaged over ~3seconds and all the momentary drops and increases were getting averaged out.

  - &moving_avg
    # we capture a new sample every 0.24 seconds, so the time can
    # be calculated from the number of samples as n * 0.24.
    sliding_window_moving_average:
      # we average over the past 2.88 seconds
      window_size: 12
      # we push a new value every 1.44 seconds
      send_every: 6

[...]

  - { phase_id: phase_a, input:  "9", power: { name: "Washer Power #9", id:  cir9, filters: [ *moving_avg, *pos ] } }

I confirmed this by removing the moving_avg filter and configured my Z-Wave outlet to send updates every 1W change and did another load of laundry.

To verify, I ran a query to total the watt-hours over the entire run-time:

from(bucket: "homeassistant")
  |> range(start: v.timeRangeStart, stop: v.timeRangeStop)
  |> filter(fn: (r) => r["_measurement"] == "W")
  |> filter(fn: (r) => r["entity_id"] == "washer_outlet_power" or r["entity_id"] == "washer_power")
  |> filter(fn: (r) => r["_field"] == "value")
  |> integral(unit: 1h)

Gave me 75Wh from the Vue2 vs 77Wh from the Z-Wave, a difference of <3% and the wave forms look like this:

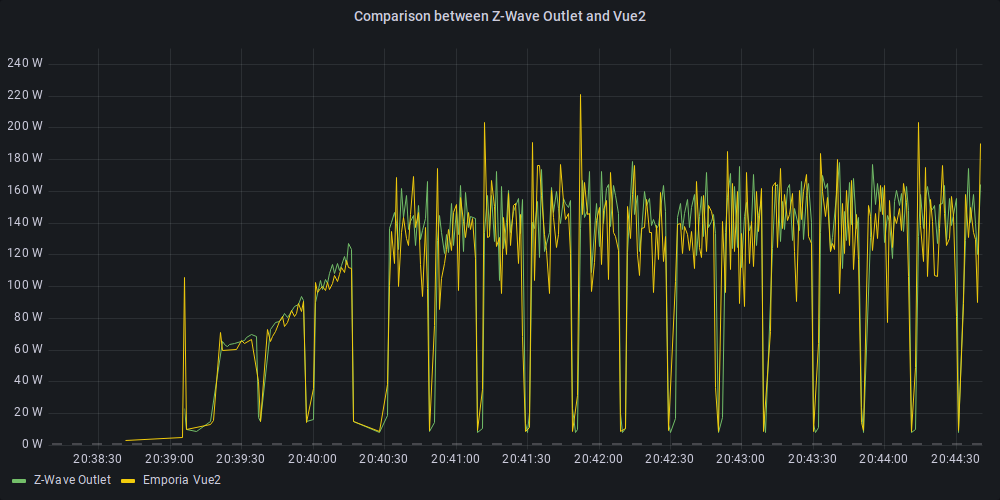
These wave forms look a lot more similar than before.
Wave Form with large difference. Possibly caused by sampling or due to apparent/real power

To fix this, I changed how all sensors worked. Previously, esphome would perform a 2.88s moving average, then integrate that value for energy consumption. However, in spiky situations, that could become quite inaccurate. Trying to use HA’s helpers to integrate this would require the esp to send a huge power updates very frequently and increase Recorder usage.

Diagram showing the ESPHome component data flow before and after.

Instead, I could tell ESPHome to integrate the raw value without any averaging and throttle both the power and energy sensor updates to something reasonable. I marked the raw sensors as internal: true, then used the copy component to send the power updates every 3s – 60s. Three seconds ensures we don’t send updates too quickly, and between 3s and 60s if the power fluctuates by >10W, then it’ll send an update, and if not it sends an updates max every 60s. This configuration provides a nice trade-off so constant, lower power devices don’t send a lot of updates.

The energy component takes the raw value and performs the integration, then sends it every 60s since there’s very little value in sending more frequently.

The following snippet shows how a single circuit is represented in the template:

.defaultfilters:
  # Reduce noise in the power class
  - &power_max
    or:
      - delta: 5
      - throttle: 60s
  - &power_min
    throttle: 3s
  - &throttle_energy
    throttle: 60s


[...]

sensor:
  - platform: emporia_vue
    [...]
    ct_clamps:
      [...]
      - { phase_id: phase_b, input: "16", power: { name: "General Power #16", internal: true, id: cir16, filters: [ *pos ] } }

  - { platform: copy, id:  cir16_b, source_id: cir16, filters: [ *power_min, *power_max ], name: "General Power #16" }

  - { power_id:  cir16, platform: total_daily_energy, accuracy_decimals: 0, restore: false, unit_of_measurement: "Wh", state_class: "total_increasing", device_class: "energy", filters: [ *throttle_energy ], name: "General #16 Energy" }

Voltage Calibration

Each phase has a voltage calibration constant value that influences how the Vue2 measures the voltage. I don’t know how this influences the current or power sensors, but let’s get it calibrated just to be sure.

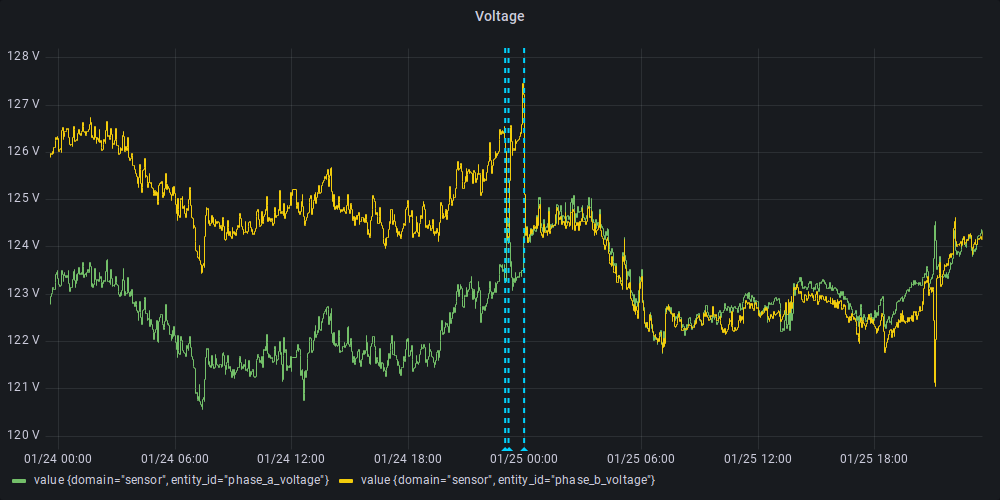
Using a volt meter, I initially tried to measure the voltage of each phase inside the breaker box connecting the negative to the neutral bar and positive to each phase main line, however the measured voltage fluctuated depending on whether the panel was open or closed. Opened when I measured it, the volt meter agreed with what was in HA, but then I closed the panel and it’d deviate. Notice the first two blue lines in the figure above. I don’t know what could cause this.

After that, I instead measured the voltage from two outlets on each phase without the panel being open. I used the formula as mentioned in the template for each phase:

# 0.022 is used as the default as starting point but may need adjusted to ensure accuracy
# To calculate new calibration value use the formula <in-use calibration value> * <accurate voltage> / <reporting voltage>

{Initial Calibration Value} * ({Measured Volts} / {Reported Volts})
0.022 * (123.0 / 126.5) = 0.022737

Then plugged both values into the template and redeployed:

sensor:
  - platform: emporia_vue
    i2c_id: i2c_a
    phases:
      - id: phase_a
        input: BLACK
        calibration: 0.022737
        voltage:
          name: "Phase A Voltage"
          filters: [*moving_avg, *pos]
      - id: phase_b
        input: RED
        calibration: 0.021295
        voltage:
          name: "Phase B Voltage"
          filters: [*moving_avg, *pos]

After that the measured voltages seemed to align with my volt meter and converged together (not that both phases need to match.)

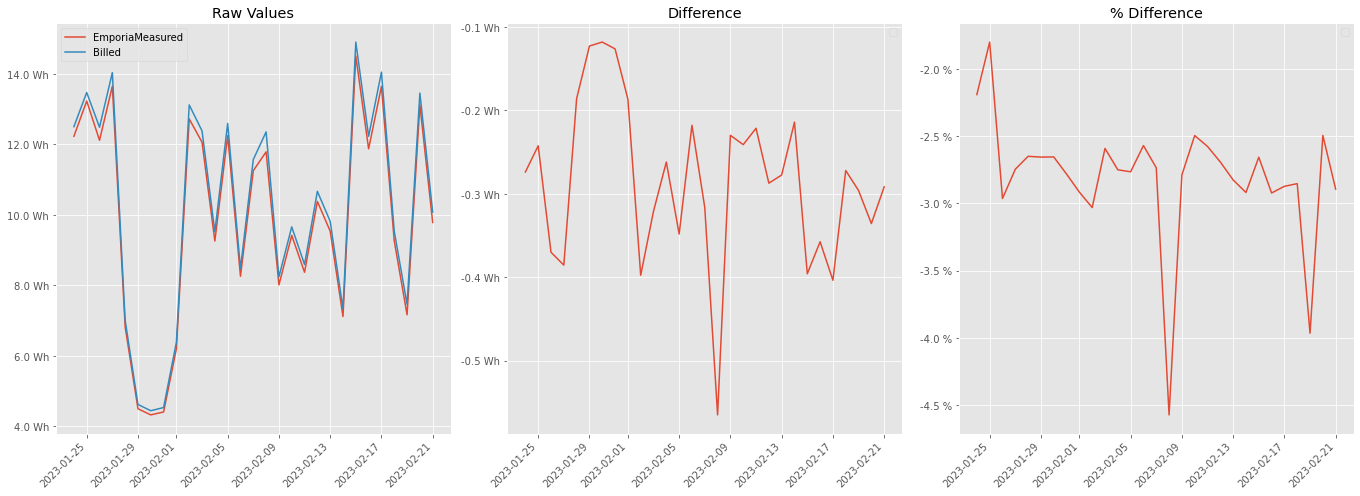
Comparison with Electric Provider

Next up, it’s time to compare it with my utility provider. This should match as close as possible so ensure that the numbers I show in Home Assistant are actually reflective of reality. My provider shows a daily energy breakdown in my account page (though they round the numbers and I had to use the browser dev tools to see the raw numbers.)

Overall pretty close with a difference of -8.26kWh over the last 30 days and ~2.8%. Not perfect, but I’ll continue to monitor and look for opportunities to improve accuracy.

Conclusion

In this post, I walked through how to use the Emporia Vue2 to monitor my whole home’s energy usage, some different strategies to improve accuracy and reduce MQTT traffic.

Series Navigation<< Visualizing Home Energy Usage in InfluxDB and Home Assistant

Leave a Reply

Your email address will not be published. Required fields are marked *