Next up in the series, we’re going to manually configure all of the network settings to get our flat network home lab. Our flat network should not use any packet encapsulation with all pods and services fully routable to and from the existing network.
Detailed in the previous post, I want a so-called flat network because packet encapsulation tunnels IP packets inside of other IP packets and creates a separate IP network that runs on-top of my existing network.) I wanted all nodes, pods, and services to be fully routable on my home network. Additionally, I had several Sonos speakers and other smart-home devices that I wanted to be control from my k8s cluster which required pods that ran on the same subnet as my other software.
Install CNI Plugin
The CNI (Container Network Interface) plugin is responsible configuring the network adapter that each Kubernetes pod has. Since each pod usually gets a separate network namespace isolated from the host’s main network adapter, without it, no pod could make any network calls. For more information, check out cni.dev or the K8s documentation.
IP Network Plan
I already have an existing home network IP space, so instead of changing everything, I’m going to define a network plan that fits around that. Readers can use their own network plan, however this blog series will reference these ranges. The only requirement is that the different subnets don’t overlap with each other.
- 192.168.2.1/32 - Main router
- 192.168.2.0/24 - Home network subnet
- 192.168.2.225/32 - The Host VM IP
- 192.168.4.0/24 - Kubernetes pod subnet
- 192.168.6.0/24 - MetalLB subnet
We’re going to use Calico as our CNI because it supports a flat network. Our goal is to use this networking option outlined here:
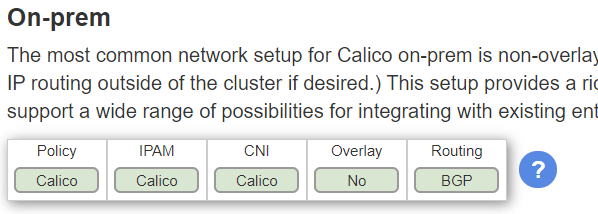
This will display any overlay network (no packet encapsulation) and use BGP enable all networks and pods to communicate. BGP (Border Gateway Protocol) is a very popular routing protocol used by ISPs to tell other ISPs what IP addresses are available on their network. It’s also being popularized inside large data centers as a mechanism to route packets to the correct rack of servers.
To start setting up Calico, follow along with the Quick Start Guide.
| |
Once the Tigera operator is installed and running on your cluster, configure Calico by creating a custom resource:
This snippet will install all Calico software and agents onto the cluster.
| |
This will configure Calico to run in a BGP mode without any type of encapsulation.
Note: The nodeSelector feature is important. Without it, the cluster may fail to start up if the Calico control software is stuck being scheduled on a down node.
Now it’s time to configure BGP. We’ll need to configure both the Router and K8s cluster.
Router
Your router may be different, but my EdgeRouter had native support for BGP. The following block configures the router to accept and make connections to the Calico node running on my VM with the correct AS number. The AS number (remote-as 64512 and bgp 64512) uniquely identifies each BGP “network” and defines a rudimentary (and bad) security control. For the purposes of this series, we’ll use the same number.
| |
Kubernetes
Create a BGP Peer relationship with the router.
| |
This should cause Calico to connect to your router. You can verify this by SSHing to the router and checking peering stats.
| |
Here we can see that Calico set the node to use IPs within the range 192.168.4.192/26. All pods running on this node should fall within this CIDR.
Now you should be able to launch pods that IP addresses that you can directly connect to.
Install MetalLB
Add a helm catalog for MetalLB
When installing metallb, use the following values.
Note: MetalLB also uses BGP to announce routes, however this won’t work with Calico also announcing routes because BGP only permits one connection at a time. This problem is documented extensively here. However, thanks to this Pull Request, we can disable the MetalLB speaker so that Calico announces routes for each Kubernetes LoadBalancer instance to the router for us.
| |
At this point, MetalLB will be installed. Now you can create an L4 LoadBalancer in Kubernetes and it should be announced over BGP:
| |
Here we can see that the load balancer at IP 192.168.6.0/32 is now being announced and I should be able to open that up in my browser and access it.
After this, you should be able to access a LoadBalancer type service running in your Kubernetes cluster from any machine on your LAN. However, Pods are not yet running on the same subnet as my LAN. Thus the smart-home software will not work without running it on the hostNetwork. In future posts, I will expose alternative networking solutions to fix this.
